How to set up an IMAP account in Mac Mail

Step 1

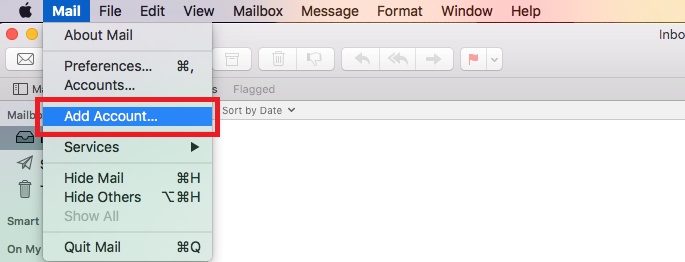
Once you have opened Mac Mail, click on Mail > Add Account
Step 2

Next select the option for Other Mail Account, and click Continue.

Step 3

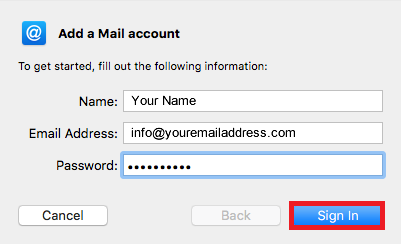
Enter a Display Name, your Email Address and your Email Password, and click Sign in.
Step 4

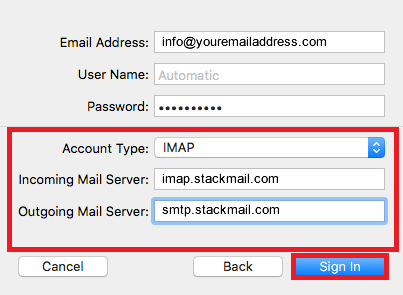
You will now need to enter the following server information, and click Sign in.
Step 5

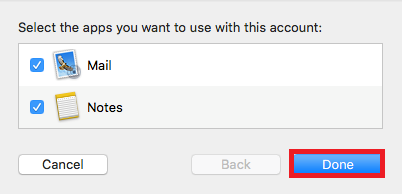
You can now click Done to complete the setup.
Additional Notes:

There are various methods of connecting to mailboxes on our platform. We always recommend IMAP as that helps keep messages in sync between various devices and our webmail system.

This is our recommended configuration for Mac Mail.

Incoming Server 

Server Name: imap.stackmail.com
Username: Your e-mail address
Port: 993
Connection security: SSL/TLS
Authentication method: ‘Normal password’

Outgoing Server (SMTP)

Server Name: smtp.stackmail.com
Username: Your e-mail address
Port: 587
Connection Security: STARTTLS
Authentication method: ‘Normal password’

If you choose to use domain-branded server names, such as mail.your-domain or imap.your-domain, the secure connection may throw a certificate warning due to a common name mismatch. This can be safely trusted and your connection will remain secure.

Rightmove and OnTheMarket Real-Time Data Feed

The Process

The process of getting properties to appear on the live Rightmove website is normally as follows:

  1. Your website must be live and fully functional with at least one property.
  2. Contact Rightmove and inform them you are looking to start sending properties using the real-time feed.
  3. They might send you a form to fill in asking for the client details and your details.
    • Important: If they ask for ‘data provider details’ this will be your details. QuantaTec is not the data provider, We are simply the tool being used.
  4. They will send you the following:
    • A zip containing a variety of certificates. The one we’re interested in is the .pem file
    • A password needed to extract files from the zip (sometimes referred to as an ‘Archive Password’ or ‘Zip Password’).
    • A password for the certificate itself
    • A network ID
    • A branch code
    • A set of URLs
      The first set of details provided will likely be for testing purposes and will change when the feeds are ready to go live.
  5. Once these have been entered you’ll then demonstrate that you can add and remove properties successfully.
  6. When everything is ok and all tests pass, Rightmove will send you a new set of certificates and URLs from step 4 to be uploaded.

That is obviously a high-level overview of the process. Next we will look at how and where to enter the above information, as well as common troubleshooting issues.

Sending Properties

Once you’ve added the portal you need to select which properties should be sent. You can do this by editing a property record and navigating to the ‘Marketing’ tab. Here you’ll see the portals listed that you can check to specify whether it should be sent or not.

Note: As well as the portal tickbox needing to be ticked, the ‘On Market’ tickbox should be checked also should you wish a property to be sent.

As soon as you click the ‘Publish/Update’ button the property will be sent to the portal(s) immediately. If the ‘On Market’ and portal tickboxes are ticked a CREATE/UPDATE request will be sent, otherwise a DELETE request will be sent. A DELETE request will also be sent if the property is drafted or trashed.

If all is successful no errors will be shown. Should an issue arise you will be notified and provided with a quick link to get to the logs so you can see exactly what the error was.